Thursday, December 13, 2012

DIY: Homemade Candles

Looking for a cheap & easy holiday gift? Look no further! Making candles is fun and, when done my way, very cheap! I'm always thinking of things to make into candles, need inspiration? Anthropology, Urban Outfitters and Pottery Barn all sell (expensive) candles anyone can make at home! So steal with your eyes & make your own!!
Supply List:
  • Old candles - my grandma hooked it up 
  • ANYTHING you want to make into a candle (Here I used candy dishes, tea cups, and a crystal goblet!)
  • Wicks - at your local craft store or Amazon.com
  • A large pot filled about half way with water
  • A glass Pyrex measuring cup **
  • Tape
  • Anything long and sturdy to hold the wicks straight
(** Pyrex is key, the glass will not shatter and the wax does not stick!)

The first step is to boil water in the large pot. Then, with broken up or crushed old candles in the Pyrex cup, drop the measuring cup in the boil water and wait for the wax to melt!
One fun part about homemade candles is mixing colors! We did a couple batches of wax and made red, yellow, and creme variations! 
The wick is not sturdy enough to stand straight alone which is why chop sticks, pencils, anything of that shape is needed! With tape and two sticks create a wick-holder as seen above.
Now the hard part: wait for the wax to harden! I generally let them sit overnight and awake to beautiful homemade candles. So grab a book, brew some tea, light these candles and enjoy winter!

Friday, August 17, 2012

DIY:: Lace Chandelier


For my new room in Oregon my overhead light is naked and needed a skirt of sorts! Also known as a home-made lace chandelier!

Supplies:
  • Lace trim- about 2 yards
  • Needlepoint hoops
  • Hot Glue
  • String & Scissors 

Measure the lace around each needlepoint hoop hot glueing as you go! Attaching hoops can be a little tricky, but what I did was cut exactly the same length string and attach it at the same spot on the inside! As you can see below use hot glue in four locations in a "x" shape connecting the hoops to each other.


Hopefully if all the strings are the same length and placed in the same location it should hang equally like a chandelier! When I get back to Oregon I shall post pictures of how it looks in my new room! Enjoy xoxo

Friday, August 3, 2012

DIY:: Mustache Pillow


Mustaches are really in right now, so what better form than pillow form! Combining my love of pillow-making with my roommate Shelby's love of facial hair!

Supplies:
  • 3 different fabrics
  • Sewing machine
  • Mustache stencil 
    • I made mine, but you could easily print one off the internet!


I dug up some leftover fabric from my prom dress to give the mustache a little class! And used a homemade stencil that I'm sure will come in handy later.


After sewing down the mustache cut the back fabric and put the fronts of the two rectangles together and stitch! Leaving an opening to turn inside out! And there you have it! 

Enjoy xoxo!

Sunday, July 15, 2012

DIY:: Wine Cork Photo Display

Having recently acquired a huge basket full of wine corks (no, I did not drink all of these bottles. Although I do fully support drinking for the purpose of crafting!) I embarked on my first wine-cork-craft: the thumbtack photo display! 
As I was trying to fill a small empty space in my new house I went for the longer, two-cork-wide shape. The supplies for this craft included:
  • Wine corks 
  • Hot glue gun
  • Ribbon
  • Pictures and thumbtacks
Use the hot glue to attach the wine corks into whatever shape you desire. 

Then simply add a ribbon to the top as a functional way to hang it... 
 And finally personalize with pictures, ticket stubs, anything!
Enjoy!

Thursday, May 17, 2012

Refashion: Old T-Shirt to Cute Tank


Although we still have a month of school left, it's already beginning to feel a lot like summer! As the sun begins to emerge from the cloudy sky we all start breaking out the summer clothing, or in this case, cutting t-shirts into cute summer tanks!


For this refashion all you need is an old t-shirt and scissors! As you can see, we cheated a little and used a plate to make symmetrical cuts for the neck line. Then cut off the sleeves as much as desired to show off those upper arms...


And tie it all together in the back with a scrap from the sleeves...


Next thing you know, we've got ourselves a cute tank! 

Enjoy!

Thursday, May 10, 2012

Ele-ele-ele-elephants!

So I must admit, there is an increasingly apparent theme of animals in our living room...
It all began with a majestic lion painting we've named Simba, and now we have some elephants to add to the zoo that is our house!
Supplies:
  • Pretty paper!
  • String
  • tape

After googling elephant outlines I was displeased with what the internet had to offer, so I made my own stencil! 

Look at all those cute little elephants!

Once they were cut out came the major decision of what order for them to hang in...

...voilĂ !


So simple! I managed to complete it in the time my roommate made soup and watched Sweeney Todd!
yumm! 

Wednesday, May 2, 2012

DIY: Mother's Day Present

Is anyone else out there struggling for a fast, cheap, thoughtful mother's day present?! Me too! 
At least until today...
I just made this quick craft for my mom with a few simple supplies:
  • Old deck of cards
  • 52 reasons why you love this person
  • Tape
  • String
  • Hole-punch
Simply type up the list of reasons, print, cut & glue! 

Enjoy!

Friday, April 27, 2012

DIY: Old T-shirt → New Pillow


This craft is the best kind of crafts: a present! My friend Lizi's birthday is just around the corner and she just signed a lease on an apartment in the lower east side in NYC. So what better pillow in her new apartment then one that expresses her love for the city!?


Now the irony behind this craft is the shirt I used was once Lizi's own! She had given it to Shelby, who then gave it to me for this pillow! So it's come full circle. 


Supplies:
  • Old t-shirt
  • Bleach
  • Scraps of fabric for the heart
  • About 16" by 16" of fabric for the back of the pillow
  • Sewing machine


You can see the original color blue of the shirt below, well I was not pleased with it. Which is why I decided to bleach it! 


After about 3 cycles through the wash the shirt was a light blue!


This shirt had a missing heart! Literally! Which is why I used a scrap of fabric to replace the missing love :)


Once the front was finished it was time for the pillow making part. For anyone who has made a pillow before can attest to the simplicity... 


...just two squares (or whatever shape/size!), patterns towards each other, stitch around the sides, leave about 5inches open on one side and fold inside out! 

Now I just have to pack, ship, and send it off to NYC! 

Hope everyone has a fabulous weekend!

Tuesday, April 3, 2012

DIY: Headboard


While home for the weekend I managed to squeeze in a few crafts, including making a headboard! Shout out to the puppy model in this post: Ramses. 

On a side note, this blog is starting to reveal my obsessions ... like chevron print...


What you'll need:
  • Fabric!
  • Quilting batting
  • A piece of wood
  • Staple gun (or strong glue)


After gathering supplies, I used my college math skills to figure out the measurements I needed to fit my bed. Now my bed at home is pretty big, like king size big, which is why I used a piece of wood that was 80 inches by 36 inches. Depending on the size of your bed, these measurements will be different. The piece of wood originally was was much bigger than those dimensions, but thanks to my handy-man father the wood was sized to my needs.


I cut the batting and fabric about 2 inches bigger around (about 84 inches by 40 inches) to be bigger than the wood.


While trying to fight off Ramses from snuggling in the batting, we laid it down and flatten it out. 

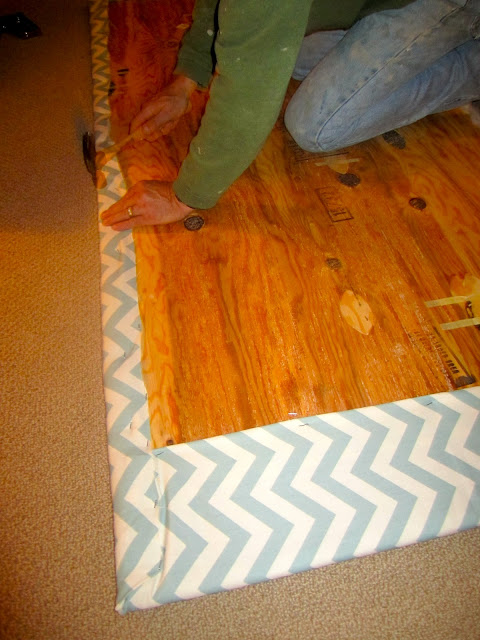
This is where the staple gun came into use. With the wood on top of the batting, fold over the extra two inches and staple, staple, staple! 


Next came the fabric, which the same step as the batting can be taken. Lay it flat on the ground with the pattern on ground (face down) and put the batting-covered wood over top. 


Below you can see we stapled about every inch to secure the fabric evenly. 


And finally, simply slipping it behind my bed to make a headboard! 


I am so pleased with how it turned out! Helping to fuel my chevron print obsession! Enjoy